
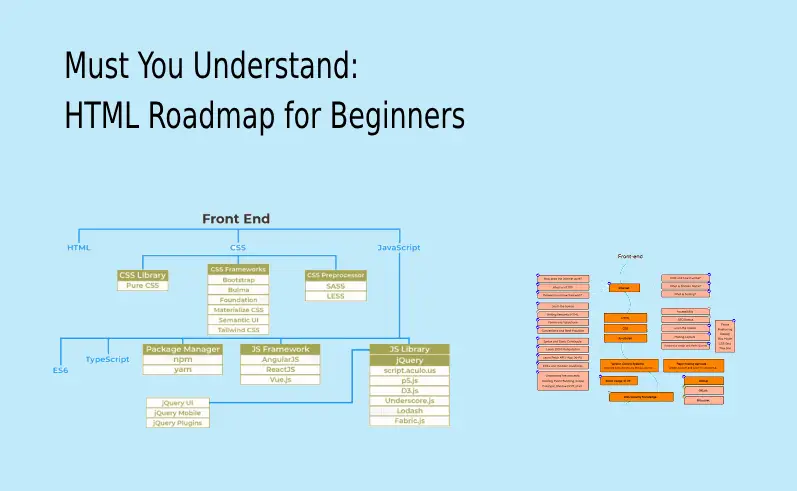
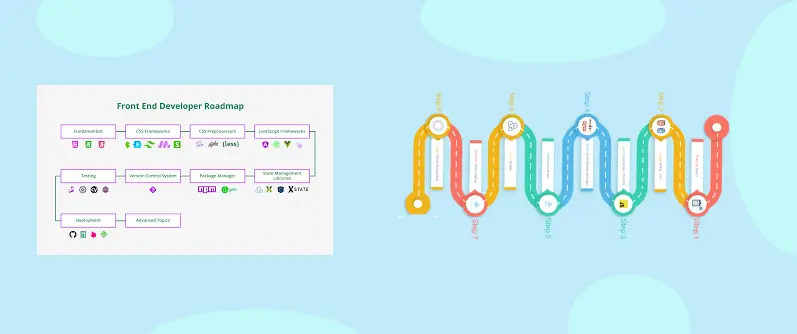
The foundation of web-based development starts with the hypertext-markup-language (HTML) which forms the basis of HTML Roadmap for Beginners. The author describes HTML as a markup-based language which allows developers to construct webpage content and layout. A beginner starting web development needs to begin with HTML Roadmap for Beginners as their essential starting point. The HTML Roadmap for Beginners provides all essential fundamental information about building web pages including basic concepts and elements alongside recommended practices. See More Blog
Table of Contents
Why learn HTML?
The necessity of HTML knowledge and its significance needs examination before we start with our beginner map.
Web development starts from the basics which are encoded by HTML programming. HTML establishes foundation and meaning patterns for website information. HTML Roadmap for Beginners
Universal functionality exists because all web browsers recognize and support HTML making it a vital characteristic for web related developers.
Web development understanding begins with HTML since it leads to learning CSS (Cascading Style Sheets) and JavaScript.
The industry demands web development skills at present and HTML stands as a key skill that employers seek.
HTML Roadmap for Beginners:
Step 1) First of All
a) What is about think HTML?
HTML stands for hypertext-markup-language. HTML serves to organize web content by defining titles as well as paragraphs and links together with other elements. HTML Roadmap for Beginners
b) Basic rules of structure for HTML document
The main constituents which define an HTML document’s structure exist in several parts. An HTML document includes this basic structure:
<!DOCTYPE html> <!-- Declares the document type as HTML5 -->
<html lang="en"> <!-- The root element with language set to English -->

<head>
  <meta charset="UTF-8"> <!-- Character encoding -->
  <meta name="viewport" content="width=device-width, initial-scale=1.0"> <!-- For responsive design -->
  <meta http-equiv="X-UA-Compatible" content="IE=edge"> <!-- For IE compatibility -->
  <title>Document Title</title> <!-- The title of the document (shown in the browser tab) -->
  <link rel="stylesheet" href="styles.css"> <!-- Link to an external CSS file -->
</head>

<body>
  <header>
    <!-- Content for the header, such as navigation or a logo -->
  </header>

  <main>
    <!-- Main content of the webpage -->
  </main>

  <footer>
    <!-- Footer content, typically copyright or contact info -->
  </footer>

  <script src="script.js"></script> <!-- Link to an external JavaScript file -->
</body>

</html>
Key Elements:
<!DOCTYPE html>: Declares the document type and version (HTML5 in this case).
<html>: The HTML root element surrounds all content appearing in an HTML document.
<head>: The head element includes all meta-information comprising title data along with encoding attributes and external resource repository (CSS, fonts etc.).
<body>: The element contains all visible textual and visual content including text images links and more. HTML Roadmap for Beginners
<header>: The header element serves primarily for both navigation bar elements and introductory page sections.
<main>: Represents the dominant content of the document (usually the main body content). HTML Roadmap for Beginners
<footer>: The footer element contains all footer components which frequently display copyright statements or contact information.
<script>: The script element connects to external JavaScript files or contains one or multiple scripts within the HTML document.
c) Text editor
Selecting your HTML code data input location requires you to determine the right text editor. The most popular editing software allows users to review rapid summaries of top code editors alongside their major features. HTML Roadmap for Beginners
The main attributes that define the best code editors can be examined in this brief summary:
Best for: Web development, Python, JavaScript, etc.
This text editor provides extensions with debugging tools alongside IntelliSense programming help and free cost structure.
Best for: Speed, lightweight use.
The editor provides quick editing functions through customizability and features both free and paid versions after a trial period. HTML Roadmap for Beginners
Best for: Customizability, open-source community.
Atom supports GitHub integration in addition to themes while providing extensibility as a core feature. HTML Roadmap for Beginners
Users who need quick adjustments should use this editor because it works with both lightweight files and fast operations.
The program offers fast operation alongside free services along with automatic syntax detection.
Best for: Front-end web development.
This program offers both Live preview and preprocessor support functionality.
d) Create your first HTML page
Develop and browse a basic HTML document to experience the fundamental web viewing process. First HTML page example appears below. The basic web page includes a heading together with a paragraph and a button. HTML Roadmap for Beginners
<!DOCTYPE html>
<html lang="en">
<head>
<meta charset="UTF-8">
<meta name="viewport" content="width=device-width, initial-scale=1.0">
<meta http-equiv="X-UA-Compatible" content="IE=edge">
<title>My First HTML Page</title>
<style>
body {
font-family: Arial, sans-serif;
margin: 0;
padding: 20px;
background-color: #f4f4f4;
}
h1 {
color: #333;
}
p {
font-size: 16px;
color: #555;
}
button {
padding: 10px 20px;
font-size: 16px;
background-color: #007BFF;
color: white;
border: none;
cursor: pointer;
}
button:hover {
background-color: #0056b3;
}
</style>
</head>
<body>
<header>
<h1>Welcome to My First HTML Page!</h1>
</header>
<main>
<p>This is a simple HTML page I created. It has a heading, a paragraph, and a button. Click the button to see something fun!</p>
<button onclick="alert('Hello, world!')">Click Me!</button>
</main>
<footer>
<p>Created by Me © 2025</p>
</footer>
</body>
</html>
What this page does:
On the web page you will find the title “My First HTML Page” which appears as the browser display text.
The heading element displays a beautiful welcome text through the tag. HTML Roadmap for Beginners
A communication about page content is provided through this paragraph.
A button click causes the JavaScript alert box to display “Hello world” to users. HTML Roadmap for Beginners
The footer contains copyright information which is included.
How to try it:
- Copy the code above.
- Launch your text editor whether you choose Notepad or VS Code for the process.
- Save the code after pasting it into a new file which uses the .html extension as your filename (for example, index.html).
- You can view the page functionality after opening the saved HTML file in any browser.
- The second step in creating the elements list focuses on HTML coding of elements alongside their tags.
Step 2) Importants HTML Elements:
HTML provides users with various elements and tags according to their functions that can be found below: HTML Roadmap for Beginners
| Element/Tag | Description |
|---|---|
<html> | The root element of an HTML document. |
<head> | An HTML document contains metadata that includes title information as well as charset declaration and CSS/JS file references. |
<body> | The HTML document contains its complete visible content in this section. |
<title> | The title of the document appears in the browser tab. |
<h1> - <h6> | The header tags evaluate head elements. The largest tag is <h1> while the smallest tag is <h6>. |
<p> | Defines a paragraph of text. |
<a> | The tag establishes a link for webpages or navigates users to different sections on the current page. |
<img> | Embeds an image into the page. |
<ul> | Defines an unordered (bulleted) list. |
<ol> | Defines an ordered (numbered) list. |
<li> | The element defines list items that occur within unordered or ordered lists. |
<table> | Defines a table. |
<tr> | Defines a row in a table. |
<th> | A table header cell becomes definable through this attribute. |
<td> | A table data cell receives this definition. |
<form> | The HTML form includes elements for user input through various fields. |
<input> | The input field component in an HTML form accepts different elements such as text fields, buttons and checkboxes. |
<button> | Defines a clickable button. |
<div> | A division or section in webpage content can establish page divisions for both grouping content and styling. |
<span> | A small division of content exists for both presentation and grouping purposes. |
<br> | A break line appears in the document (helps generate spacing between different page sections). |
<hr> | The <hr> tag creates an adequate horizontal rule (line) which appears in the content. |
<link> | The HTML tag links web pages to external files such as style sheets. |
<meta> | The HTML document receives metadata information such as charset, viewport definition through this element. |
<script> | The element runs client-side JavaScript instructions directly inside browser environments. |
A complete list of necessary HTML tags exists to help you arrange website content structure and appearance. Your list will grow based on your particular requirements.
Step 3) Forms and Submissions
HTML forms enable users to submit data that servers process after the information collection phase. The HTML form component functions as an information collection definition tool that handles user input elements. HTML Roadmap for Beginners
Basic Form Structure
<!DOCTYPE html>
<html lang="en">
<head>
  <meta charset="UTF-8">
  <meta name="viewport" content="width=device-width, initial-scale=1.0">
  <title>Form Example</title>
</head>
<body>

  <h1>Contact Us</h1>

  <form action="/submit_form" method="POST">
    <!-- Input field for the user's name -->
    <label for="name">Name:</label>
    <input type="text" id="name" name="name" required>
    <br><br>

    <!-- Input field for the user's email -->
    <label for="email">Email:</label>
    <input type="email" id="email" name="email" required>
    <br><br>

    <!-- Input field for the user's message -->
    <label for="message">Message:</label>
    <textarea id="message" name="message" rows="4" cols="50" required></textarea>
    <br><br>

    <!-- A submit button to send the form data -->
    <button type="submit">Submit</button>
  </form>

</body>
</html>
Key Form Elements:
The form element defines the structure of the complete form. A form needs two main attributes to operate properly: action specifies the URL endpoint and method sets the data transmission format as GET or POST.
The form data travels toward the specified action which describes the URL or endpoint destination. HTML Roadmap for Beginners
An HTTP method to use for form submission is specified through action (GET for URL data transmission and POST for body data transmission).
The element provides a form component with its proper description. An input field links to the for attribute which requires the same identifier value as its corresponding input element. HTML Roadmap for Beginners
Users can write text through input elements which create entry points for data entry. The type attribute determines which type of form field appears as text, email, password among others.
<textarea>: Defines a larger input area for multi-line text, such as a message or comment.
The button element enables users to submit their forms by pressing the button. The input element’s submit type along with button remains an option but the button element provides greater freedom. HTML Roadmap for Beginners
Handling Form Submissions:
Submissions from users go to the server mentioned in the action attribute of the <form> element.
A POST method inserts the form data within the HTTP request body while GET methods place it as URL query parameters.
Example:
The server located at /submit_form will handle data processing when users submit the form. The basic procedure for handling form submissions entails server-side programming through languages such as PHP, Node.js, or Python which stores data in databases or similar storage systems.
Common Form Elements:
Users can enter a one-line text with Text Input tag (<input type=”text”>).
Password Input (<input type=”password”>): Hides the characters as the user types. HTML Roadmap for Beginners
Email Input accepts user input through the type=”email” attribute which ensures data validity according to email address specifications.
Radio Buttons with HTML input tags of type “radio” allow users to pick one possibility among multiple options. HTML Roadmap for Beginners
Areas where users can choose single or multiple options from listed choices are managed through checkbox components (type=”checkbox”).
Select Dropdown (<select>):
Provides a dropdown list of options.
The <input type=”file”> tag enables users to pick one or multiple files for uploading. HTML Roadmap for Beginners
JavaScript Form Validation:
The required attribute in HTML enables client-side validation yet form validation before submission can be achieved through JavaScript.
A basic approach to implement JavaScript form validation looks like this:
<form id="myForm" onsubmit="return validateForm()">
  <label for="name">Name:</label>
  <input type="text" id="name" name="name">
  <button type="submit">Submit</button>
</form>

<script>
  function validateForm() {
    const name = document.getElementById("name").value;
    if (name === "") {
      alert("Name must be filled out!");
      return false;
    }
    return true;
  }
</script>
Step 4) HTML Attributes
Some fundamental HTML attributes along with their descriptions appear in this following table.
| Attribute | Description | Example |
|---|---|---|
id | A unique value enables an element on the page to get recognition. | <div id="header">Header</div> |
class | An element receives its style information from specified class names for visual and scripting purposes. | <p class="text-bold">Bold Text</p> |
style | An element gets its style specifications from this inline CSS attribute. | <div style="color: red; font-size: 20px;">Styled Text</div> |
src | A media source (either file path or URL) should be defined when working with images and audio and video files. | <img src="image.jpg" alt="Description of image"> |
alt | The alternative text provides descriptions of images that users can access if they cannot view them. | <img src="image.jpg" alt="Image Description"> |
href | A hyperlink URL pointing can be set using this attribute. | <a href="https://www.example.com">Visit Example</a> |
target | The specified value determines if the linked document should open in a new tab or within the same window. | <a href="https://www.example.com" target="_blank">New Tab</a> |
name | One can identify form elements for data submission through element names. | <input type="text" name="username"> |
value | The value parameter sets the default contents for text fields, options and button elements. | <input type="text" value="Hello"> |
placeholder | An input field displays initial content which disappears after users begin entering their value. | <input type="text" placeholder="Enter your name"> |
disabled | Disables an element, preventing interaction. | <button disabled>Submit</button> |
readonly | Users can perform text selection and make copies from input fields which the read-only attribute protects but does not permit value changes. | <input type="text" value="Read-only" readonly> |
checked | The element automatically selects its first option upon loading the page. | <input type="checkbox" checked> |
maxlength | The input field accepts no more than ten characters through this attribute. | <input type="text" maxlength="10"> |
type | Users require an element specification for selection among text, password and checkbox forms types. | <input type="password"> |
action | When users submit the form the data will send to the specified URL for processing. | <form action="/submit_form"> |
method | The HTTP method selection for form data submission lies within this attribute (GET, POST, etc). | <form method="POST"> |
for | Each <label> needs its for attribute to reference a form field through its id attribute. | <label for="name">Name:</label><input type="text" id="name"> |
role | The role attribute shows what an HTML element performs (a function usually helpful for accessibility needs). | <div role="navigation">Menu</div> |
data-* | This element enables developers to create their own custom data values for data storage purposes. | <div data-user-id="1234">User Profile</div> |
lang | The element content language appears in this tag. | <p lang="en">An English paragraph exists in the following text.</p> |
content | The content and keywords find their definition through <meta> tags using the content attribute. | <meta name="description" content="Sample Page"> |
cols | A <textarea> element shows its visible width through the cols attribute measured in characters. | <textarea cols="30" rows="5"></textarea> |
rows | The <textarea> element shows its content through the defined lines of text visible to users. | <textarea rows="4" cols="50"></textarea> |
Step 5) HTML Validation
HTML validation constitutes the process of checking that webpage HTML code upholds all requirements established by the W3C (World Wide Web Consortium) and related groups. The main purpose of HTML validation exists to verify proper format adherence together with syntactical compliance and absence of code errors. Proper HTML validation stands significant due to its benefits for user accessibility together with browser support and web discovery through search engines. HTML Roadmap for Beginners
Key Aspects of HTML Validation:
HTML documents require correct syntax involving proper usage of HTML tags which must always include paired closing tags. The correct definition of attributes and proper element nesting according to valid hierarchy must be observed. HTML Roadmap for Beginners
A standard HTML document needs to maintain the rules set by current specifications of HTML including HTML5. The webpage maintains browser support together with optimal performance and security requirements because of standards compliance.
All HTML documents must contain a complete structure of , , and tags to be considered well-formed. Browsers decode documents with ease through proper document structure because it dictates the main organization of data. HTML Roadmap for Beginners
The available validation tools enable users to check HTML code. The W3C Markup Validation Service operates as one of the most popular tools used to validate your HTML document against standard HTML compliance. The tool analyzes documents to find errors related to uncompleted tags as well as unclosed elements and invalid attributes and broken nesting rules. HTML Roadmap for Beginners
W3C Validator: https://validator.w3.org/
Step 6) HTML Best Practices
When writing HTML, following best practices ensures that your web pages are well-structured, accessible, SEO-friendly, and maintainable. Here are some best practices to keep in mind when developing HTML code:
1. Use Semantic HTML Tags
- Why: The HTML semantic tags <header>, <footer>, <article>, <section> and <nav> create meaning in content which simplifies developer comprehension and supports search engines and assistive technology to understand page structure and function.
- Example:
<header> <h1>Welcome to My Website</h1> </header> <section> <h2>About Us</h2> <p>Information about the company.</p> </section> <footer> <p>© 2025 Company Name</p> </footer>
2. Use Proper Indentation
- Why: Having consistent indentation in your code improves both its readability together with maintainability. Maintaining projects while working in teams becomes easier with consistent indentation.
- Example:
<div> <h2>Article Title</h2> <p>This is the article content.</p> </div>
3. Keep HTML Simple and Minimal
- Why: Every new line of HTML or extra code should be avoided for optimized page performance. The page load speed increases while error potential decreases when you maintain a simple page structure. HTML Roadmap for Beginners
- Example: Only include essential tags like headings, paragraphs, lists, and images rather than excessive
<div>tags.
4. Include Descriptive alt Text for Images
- Why: Screen readers together with search engines use alt text as a necessary element. Users who need descriptions of images and those dealing with non-loading images will benefit from this feature.
- Example:
<img src="logo.jpg" alt="Company Logo">
5. Use External CSS and JavaScript
- Why: The shift of CSS and JavaScript into different files allows your HTML file to maintain clarity while making the code more manageable. The HTML document will become smaller in size due to this separation.
- Example:
<link rel="stylesheet" href="styles.css"> <script src="script.js"></script>
6. Add lang Attribute to <html> Tag
- Why: Language specification enhances search engine and browser and accessibility tool understanding of content.
- Example:
<html lang="en">
7. Close All Tags Properly
- Why: The practice of completing all tag closures remains vital because modern browsers support it but future compatibility can benefit from this habit. HTML Roadmap for Beginners
- Example:
<p>This is a paragraph.</p>
8. Use Meaningful and Unique IDs and Classes
- Why: The use of distinctive identifiers and well-described class names helps both style architecture and script writing also supports code maintenance. Avoid generic names like div1, section2.
- Example:
<div id="main-content" class="section"> <h2>Title</h2> <p>Some content here.</p> </div>
9. Provide Forms with Clear Labels
- Why: Labels that provide clear descriptions help all users especially readers who depend on screen access features. The labels’ for attribute should match exactly with the forms’ id value. HTML Roadmap for Beginners
- Example:
<label for="email">Email:</label> <input type="email" id="email" name="email">
10. Use the Correct Document Structure
- Why: The proper structure of an HTML document is essential because it enables better accessibility as well as enhances SEO performance and ensures browser compatibility. All HTML documents should include the DOCTYPE element followed by html along with head and body tags.
- Example:
<!DOCTYPE html> <html lang="en"> <head> <meta charset="UTF-8"> <meta name="viewport" content="width=device-width, initial-scale=1.0"> <title>Document</title> </head> <body> <h1>Welcome</h1> </body> </html>
Step 7) Common Problems in HTML
The process of creating HTML often leads developers into various regular issues that developers must learn to address. Web site development requires attention to problems as they naturally appear to produce solid results.
1. Missing or Unclosed Tags
- Problem: HTML elements that lack closure tags as well as those that remain open may cause elements to break rendering and display unexpected content in different browsers. HTML Roadmap for Beginners
- Solution: Every HTML opening tag requires a matching closing tag which should appear in correct nested order.
- Example:
<p>This paragraph is missing a closing tag.
2. Incorrect Nesting of Elements
- Problem: Web elements face defective visual presentation due to putting block-level tags within inline content such as placing <div> inside <span>.
- Solution: The solution requires maintaining proper element nesting structure based on HTML specifications.
- Example:
<span><div>Invalid Nesting</div></span> <!-- Incorrect -->
3. Invalid or Missing Attributes
- Problem: Improper utilization of unsupported element attributes together with the absence of necessary attributes will result in function breakdown and styling disturbances. HTML Roadmap for Beginners
- Solution: To ensure correct attribute application you should validate your HTML through W3C Validator and consult documentation.
- Example:
<img href="image.jpg" alt="Image"> <!-- Incorrect: `href` is not valid for `img` -->
4. Broken Links or Missing Files
- Problem: External resources such as images or files connected through URLs may fail to load when the URLs prove incorrect or when files are absent.
- Solution: The solution requires users to verify that all file paths lead to the correct places and all URLs point to appropriate destinations. The use of relative paths should happen for local files and absolute URLs should be selected for external resources.
- Example:
<img src="images/logo.png" alt="Logo"> <!-- Make sure the file path is correct -->
5. Improper Character Encoding
- Problem: Special characters appearing as accented letters or symbols remain undisplayable unless proper character encoding configurations are established. HTML Roadmap for Beginners
- Solution: Place the correct character encoding value (UTF-8) inside the <meta> element located within the <head> tags.
- Example:
<meta charset="UTF-8">
6. Browser Compatibility Issues
- Problem: HTML elements together with CSS styles occasionally fail to receive browser support which results in variation between the final display output. HTML Roadmap for Beginners
- Solution: You should test HTML views across various browsers and devices along with implementing feature supports using vendor prefixes or polyfills for non-compatible features.
- Example:
.element { display: flex; /* Older browsers may need vendor prefixes */ }
7. Lack of Accessibility Features
- Problem: Platforms created with HTML must remain usable for disabled users through the implementation of accessibility features which include image alt text alongside ARIA roles as well as keyboard accessibility support.
- Solution: Users need to follow Web Content Accessibility Guidelines along with using correct elements such as aria-label, alt, and role to enhance accessibility for all users.
- Example:
<img src="image.jpg" alt="A descriptive text of the image">
Diploma:
Web development begins with the basic rule of studying the HTML Roadmap for Beginners. The HTML Roadmap for Beginners serves as a comprehensive roadmap for users to learn basic HTML. You should learn HTML until you feel comfortable then explore web related technologies including CSS and JavaScript to improve your website development abilities. Web development competence requires three essential growth factors which include practice together with patience along with continuous learning. Good luck on your HTML learning journey for HTML Roadmap for Beginners!