

Ghost Theme Development is the process of creating header and/or footer with necessary functionalities specific to the Ghost content management system. In contrast to other content management systems full of highly technical features, Ghost Theme Development looks like an elegant tool primarily designed for professional writers. Ghost Theme Development is associated with handing templates with the Handlebars.js, SEO optimization, responsive web design, and the usage of superior web technologies. Whether you are an app developer interested in translating an innovative concept into code or an entrepreneur desiring to create an eye-popping, professionally-designed website that provides a superior user experience, Ghost Theme Development delivers them both. See more informative blog
Table of Contents
1) What is Ghost?
Ghost is a robust, open-source publishing tool that intends to function for serious publishers. Offering incredible speed, easy customization, and elegant looks, Ghost Theme Development is perfect for bloggers, journalists and online magazines. I believe its principle of theming engine is its most distinctive feature since it builds the power of developing personalized and top-quality themes that help optimize user experience and boost SEO.
2) Why Choose Ghost?
Performance: Ghost is designed on a current technology platform by using Node.js and it’s super fast and can easily scale.
Simplicity: The platform provides a way to write without too many distractions which makes it fit for freelancers.
Flexibility: The theming system of Ghost is very flexible and can be best customized to make stunning unique designs.
SEO Friendly: Specifically, Ghost has the bult-in search engine optimization so it can be easier to promote your content on the Internet.
3) Why Develop a Ghost Theme?
Creating a custom Ghost theme development provides numerous benefits:
Customization: Specific needs should be met by tailor-designing the design and functionality of the site.
Performance: Develop effective premium and freemium themes that make website loads faster and enhance the usability.
SEO Benefits: Its focuses its functionality on making and optimizing themes, which can bring better results in search engine rankings.
Monetization: Take part in the Ghost community by selling other Ghost user’s custom themes.
4) How to need start for Ghost Theme Development?
Before diving into Ghost theme development, ensure you have the following:
1) HTML, CSS, and Javascript knowledge to the basic level
2) Knowledge with the specification of this blog platform including but not limited to Handlebars.js (which is a template of the Ghost blog).
3) The Node.js tool was set up in a local development environment.
4) It will outline how one can effectively set up the developmental environment including the following topics:
5) Setting Up Your Development Environment.
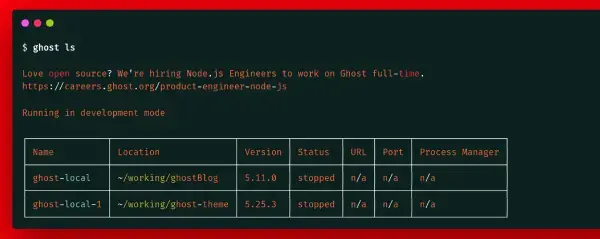
- Install Ghost Locally:
   npm install ghost-cli -g
ghost install local- Create a New Theme Directory:
If you’re new to Ghost themes, your first step is to create a new folder in the content/themes directory of your Ghost installation. - Understand the Theme Structure:
A typical Ghost theme includes:
package.json: Theme metadatadefault.hbs: Main template fileindex.hbs: Homepage templatepost.hbs: Single post templatepartials/: Reusable Components Directory
6) Basic Ghost Theme Development
- Setting Up package.json:
Define your theme’s metadata inpackage.json:
   {
     "name": "my-ghost-theme",
     "version": "1.0.0",
     "description": "A custom theme for Ghost",
     "author": "Your Name"
}- Creating the default.hbs File:
The default.hbs file is one of the most important files of your theme. Start with a basic HTML structure:
   <!DOCTYPE html>
   <html lang="en">
   <head>
     <meta charset="UTF-8">
     <title>{{meta_title}}</title>
     {{ghost_head}}
   </head>
   <body>
     {{> header}}
     {{content}}
     {{> footer}}
     {{ghost_foot}}
   </body>
</html>- Building Partials:
Bring into being inferior template blocks in the partials/ directory. For example, a header (header.hbs):
   <header>
     <nav>
       <a href="{{@site.url}}">Home</a>
       <a href="{{@site.url}}/about">About</a>
     </nav>
   </header>
7) Advanced Customization
- Dynamic Routing:
With Ghost Theme Development dynamic routing, you can customise the page templates and the structure of the URL. There are specified directures in known file such as the routes.yaml file. - Helper Functions:
Employ Ghost’s small helper functions which allow for adding dynamic content and condition checking to templates. For instance there is {{#foreach}}, {{#has}}, and {{get}}. - CSS and JavaScript:
Customise your theme with Lowville CSS and JavaScript. Place these files in the assets/ directory and link them in your default.hbs:
   <link rel="stylesheet" href="{{asset "css/style.css"}}">
   <script src="{{asset "js/script.js"}}"></script>
8) SEO Best Practices
- Meta Tags:
Ensure your theme includes meta tags for SEO, such asmeta_titleandmeta_description:
   <title>{{meta_title}}</title>
<meta name="description" content="{{meta_description}}">- Structured Data:
Implement structured data using JSON-LD to help search engines understand your content:
   <script type="application/ld+json">
   {
     "@context": "http://schema.org",
     "@type": "Blog",
     "url": "{{@site.url}}",
     "name": "{{@site.title}}",
     "description": "{{@site.description}}"
   }
</script>- Performance Optimization:
In essence, you can work on your theme and tweak it in a way that makes it highly efficient by reducing the number of used CSS and JavaScript files, implementing browser caching, and using the right images for your theme, which are responsive.
9) Creating a Unique Design
Typography:
Use fonts that are easy on the eye and which should also support the general branding strategy of your website. Choose available typefaces or else use web type fonts from services such as Google Web Fonts.
Color Scheme:
Choose the colors you want your site to display based on the image that you want to portray of your brand. Such factors include a contrast between colours so that text can easily be read on the background colours used.
Layout:
Create structure that will allow users to navigate your materials smoothly. Here whitespace should be employed in the manner that will produce the least amount of visual noise.
Imagery:
Choose crisp, high definition images that will fit the context of your blog. If you are using images in your website, it is very important that it has to load fast and therefore, optimize images for the web.
10) Testing Your Theme
It is also recommended to test your theme before its release to avoid problems connected with compatibility with all major browsers and devices.
Cross-Browser Testing:
Check your theme in relevant web browsers including Google Chrome, Mozilla Firefox, Apple Safari and Microsoft Edge.
Responsive Design Testing:
Make sure your theme is beautiful on wide resolutions, laptops, desktops, tablets, and smartphones.
Performance Testing:
Maximizing your theme’s performance can be done using tools like the Google PageSpeed Insights.
Accessibility Testing:
Ensure your themes are friendly to all user interfaces especially to the disabled users. For example, there is a tool named WAVE that can help us determine problems with accessibility and to remove them.
11) Deploying Your Theme
Having conducted your tests or debugging, and as soon as possible the best theme fits your needs, it then provides a suitable time to deploy the theme.
Upload to Ghost:
Zip your theme folder and then upload your compressed file through Ghost admin panel, in the “Design” section.
Activate Your Theme:
After uploading, you enable your theme making it available for use on your website.
Monitor and Update:
After using this site, it is advisable that you keep an eye on it for any problem which may arise. It’s also important to note that you should frequently update your theme to differentiate between bugs to be solved as well as new features to integrate.
12) More Guidelines for Ghost Theme
Stay Updated:
To find out about the current updates for Ghost and recommended usage, be sure to read the blog and check out the forums.
Learn from Others:
Check out other Ghost themes to know how they are designed and seek ideas for your ventures.
Use Version Control:
Ensure that you are using version control system type of a theme like Git when developing your theme. This will help you track changes and make certain revisions much easier when working with other people.
Documentation:
Record all your theme’s options and the changes you made to them. This will help the users to be in a better position to know and appreciate the use of your theme.
Support and Feedback:
Give support to your theme users and also take your time to listen to what they are saying. This will assist you in enhancing your theme and making more users to stick to your site.
Conclusion
Ever since the concept of building website came into existence, there are number of ways that one could build beautiful, fast and SEO friendly website through Ghost Theme Development. By using this comprehensive guide, you may develop an exclusive theme that meets your requirements and targets as well as grabs people’s attention in the oversaturated world wide web environment. This article takes you through every single step of the process from installing your Ghost Theme Development environment to deploying and updating your First Ghost Theme Development. Excellent theming done!
If you have benefitted from this guide in any way, make sure to pass the word to the Ghost theme developers out there. If you are interested in more detailed tutorial or other kinds of documentation before using Ghost, visit Ghost Theme Development Documentation. Happy coding!