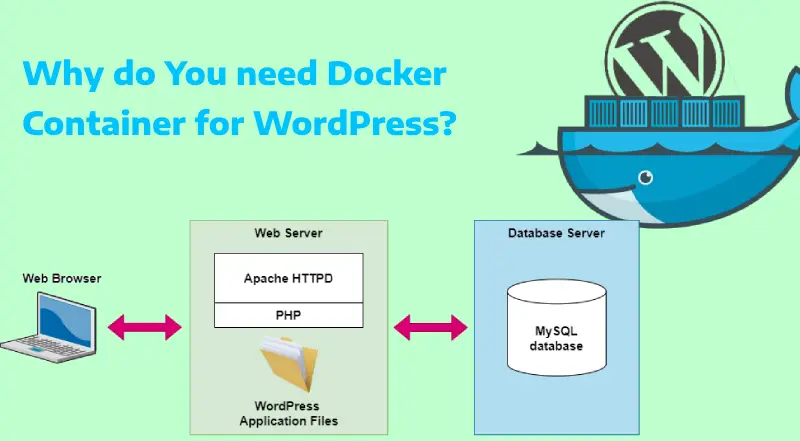
The Docker Container for WordPress platform provides developers with a system that enables them to create package deployments and application operation through containers. Applications deployed through containers achieve consistent execution in any environment because they remain lightweight and simple to move between systems. The following guide explains how to establish Docker containers for WordPress which serves as a common content management system (CMS) and blogging environment. See more blog
Table of Contents
What are The Reasons to Choose Docker Container for WordPress ?
Docker Container for WordPress brings several advantageous features to the platform.
Containers generate application separation along with dependency seclusion to stop clashes with other software found on the host machine.
The Docker container functions on any machine where Docker has been installed. The system allows easy movement and installation of WordPress instances.
You gain complete control over versioning WordPress along with PHP and additional dependencies by stating specific versions which makes all development and production and staging environments match.
The Docker platform helps users easily expand WordPress container capacity by adding new container instances.
Docker container for WordPress through Step By Step instructions.
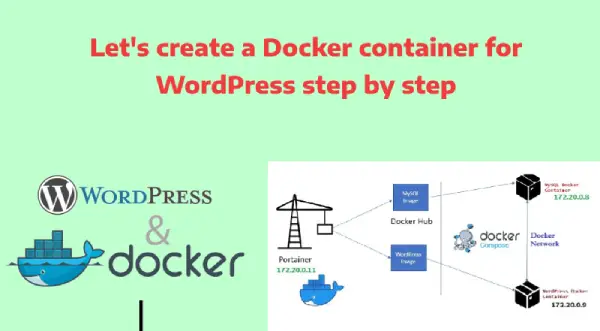
1. Install Docker:
Before continuing obtain Docker software for your computer system. You can get step-by-step instructions for Docker installation from the official guides of your platform at https://docs.docker.com/get-docker/ .
2. Create Docker Network:
Establishing the Docker network through a good practice creates a necessary connection between WordPress containers and database containers. Balancing technical processes becomes simple through your terminal by using this command sequence.
Code:
Docker network creates WordPress-net The created bridge network obtains the name ‘wordpress-net’.
3. Set Up a MySQL Container:
To function WordPress depends on storing its data in an active database. The required database functions can be provided by using a MySQL container. Through this command you can create a MySQL container in the WordPress-net network.
Code:
docker run -d \
--network wordpress-net \
--name mysql-container \
-e MYSQL_ROOT_PASSWORD=your_root_password_here \
-e MYSQL_DATABASE=wordpress \
-e MYSQL_USER=wordpress \
-e MYSQL_PASSWORD=your_password_here \
mysql:5.7
Insert strong passwords instead of your_root_password_here and your_password_here into the command. The command creates a MySQL container that contains the database WordPress and user WordPress with the entered password.
4. Create a WordPress Configuration Directory:
Make a new directory on your Linux computer where you will save all your WordPress configuration material. The custom directory enables you to customize WordPress configurations as well as save and track your installation changes. For example:
Code:
mkdir wordpress-config 5. WordPress Docker Image:
Obtain the WordPress Docker image from Docker using this single command:
Code:
docker pull wordpress: latest
The command enables retrieval of the newest WordPress image that resides in the official repository.
6. Configure WordPress:
Write and place a wp-config.php file containing WordPress configuration details inside your WordPress-config directory. Here’s a minimal example:
Code:
<?php

define( 'DB_NAME', 'WordPress' );
define( 'DB_USER', 'WordPress' );
define( 'DB_PASSWORD', 'your_password_here' );
define( 'DB_HOST,' 'mysql-container' );
define( 'DB_CHARSET', 'utf8' );
define( 'DB_COLLATE', '' );
Remember to swap ‘your_password_here’ with the actual password you defined for MySQL’s user authentication in the recent procedure. The configuration file reveals to WordPress how it can access the MySQL database container.
7. Establish Docker Volume which Hosts WordPress Data:
A Docker volume creation step is required to keep WordPress data safe after restarts or updates of containers. The following command is needed:
Code:
Docker volume creates WordPress-data This command makes the Docker volume titled”wordpress-data.
8. Run the WordPress Container:
Running the WordPress container while linking it to MySQL and setting up the WordPress data volume storage is what we need to do now. Use the following command:
Code:
docker run -d \
--network wordpress-net \
 --name WordPress-container \
-p 8080:80 \
-v WordPress-config:/var/www/html/wp-config \
-v WordPress-data:/var/www/html/wp-content \
WordPress: latest
9. Let’s break down this command:
This flag connects the container to the wordpress-net network which enables communication with the MySQL database container through it.
MySQL container.
Under this directive the WordPress-container receives its managerial name.
-p 8080:80: Maps port 8080 on your host to port 80 in the container.
-v WordPress-config:/var/www/html/wp-config: Mounts the WordPress-config directory as the WordPress configuration directory.
-v WordPress-data:/var/www/html/wp-content: Mounts the WordPress-data volume as the WordPress content directory.
The WordPress installation page will be accessible through your browser at http://localhost:8080. WordPress will present its installation webpage for viewing.
(3) Table for Docker Containers for WordPress:
| Step | Action | Description | Example |
|---|---|---|---|
| 1 | Install Docker | Your system needs Docker and Docker Compose installation. | sudo apt install docker.io docker-compose |
| 2 | Create docker-compose.yml File | The docker-compose.yml file establishes how the WordPress service along with the MySQL service should be deployed. | See file below |
| 3 | Define WordPress Service | Set up the WordPress container by using the official WordPress image while establishing environment variables. | image: wordpress:latest |
| 4 | Define MySQL Service | Create a MySQL configuration in the Docker container and establish the database authentication values for WordPress. | image: mysql:5.7 |
| 5 | Set Volumes for Data Persistence | The docker configuration should contain instructions for storing WordPress database and MySQL information in persistent volumes. | volumes: wordpress_data:/var/www/html |
| 6 | Set Network for Communication | Network customization along with configuration will ensure the containers maintain communication capabilities. | networks: wordpress_network |
| 7 | Run the Containers | Launch the WordPress and MySQL system by running a docker-compose command. | docker-compose up -d |
| 8 | Access WordPress | The administrative process for WordPress setup begins at http://localhost:8080 through the web browser. | http://localhost:8080 |
(4) Example docker-compose.yml File:
version: '3.8'

services:
  wordpress:
    image: wordpress:latest
    container_name: wordpress
    restart: always
    ports:
      - "8080:80"
    environment:
      WORDPRESS_DB_HOST: db:3306
      WORDPRESS_DB_NAME: wordpress
      WORDPRESS_DB_USER: root
      WORDPRESS_DB_PASSWORD: example
    volumes:
      - wordpress_data:/var/www/html
    networks:
      - wordpress_network

  db:
    image: mysql:5.7
    container_name: mysql
    restart: always
    environment:
      MYSQL_ROOT_PASSWORD: example
      MYSQL_DATABASE: wordpress
      MYSQL_USER: root
      MYSQL_PASSWORD: example
    volumes:
      - db_data:/var/lib/mysql
    networks:
      - wordpress_network

volumes:
  wordpress_data:
  db_data:

networks:
  wordpress_network:
    driver: bridge
The table and configuration file present straightforward documentation of the procedures to deploy Docker containers running WordPress with MySQL database backend.
(5) Warning: Installing Docker Containers for WordPress
A warning guide exists for Docker container installation to run WordPress. Follow the instructions meticulously since they contain important specifications that protect you from installation failures.
1. Verification of Docker and Docker Compose installations.
Begin only after confirming Docker together with Docker Compose operate correctly on your system.
Docker containers will fail to start when the platform is not properly running or when the application is out of date.
Solution:
The system can check for Docker installation status through these commands: docker –version docker-compose –version
The command to activate Docker when it is not active is sudo systemctl start docker.
2. Port Conflicts
The WordPress container binds to local port 8080 when you access it via your machine.
The Docker system will fail to connect to port 8080 when another application uses the same number since it cannot establish bindings with occupied addresses.
Solution:
Execute this command before continuing: sudo lsof -i :8080
Modify the port definition in your docker-compose.yml file according to your needs either for 8081 or other alternative port values. ports: – “8081:80”
3. Database Connection Issues
WordPress requires MySQL database service to store its content. The WordPress application needs MySQL to operate so a failed database startup results in a disrupted connection.
The potential problem exists when either MySQL database fails to initialize correctly or when the container fails to start properly.
Solution:
It is essential to examine MySQL container logs by running docker-compose logs db.
All environment variables including MYSQL_ROOT_PASSWORD need to contain accurate database credentials.
4. Insufficient System Resources
The execution of Docker containers needs system hardware elements including CPU power together with memory capability as well as storage capacity. Lack of resources will result in failed containers.
The WordPress container faces a risk of unstable operation because of poor resource availability such as insufficient memory.
Solution:
Users should monitor system resources through the combination of free -h along with top.
The system should be checked for available resources to either release unused space or expand CPU and memory settings, depending on the Docker Desktop platform.
5. Persistent Data Storage
MySQL data together with WordPress content are automatically stored within Docker volumes by default.
The deletion of untied containers results in data loss because you did not persist the volumes.
Solution:
The docker-compose.yml file requires correct volume definitions for persistent data storage under the volumes key with wordpress_data and db_data specifications.
6. Network Configuration
A proper network connection exists between WordPress and MySQL to maintain the required communication between these systems. Misconfigurations can cause connection issues.
The absence of a properly defined custom network together with failed container connection can lead to WordPress failing to reach MySQL.
Solution:
Network containers must have exactly the same network configuration under the wordpress_network element where driver is set as bridge.
7. Troubleshooting Logs
Rephrase the container startup problems by examining the logs to find and solve diagnostic issues.
Running both containers’ logs at once can be done through the commands docker-compose logs wordpress docker-compose logs db
Conclusion:
The following detailed guide presents instructions for establishing Docker containers to support WordPress installations. The method provides platform-specific features which include version control and scalability along with portable capabilities and isolate logic functions to make it the top option for WordPress deployments. The above process allows users to establish WordPress instances inside Docker containers for dependable web project applications.